Let me start with a quick introduction. My name is Pam Morris and I have been a demonstrator with Stampin’Up! since 2001. In March of 2012 I made the decision to drop and sign back up under Mary. It was one of the best decisions I have made in all my years as a demo. Less than a week later I was contacted by a local stamper who was interested in getting back into stamping. I was thrilled to begin recruiting and couldn’t be happier to sign my first downline, Brian King. Weeeee…Let the fun begin, right? Little did I know that my business would put me smack dab in the middle of a Fish and a King! I feel that I have some pretty big shoes to fill but there is no place that I would rather be.
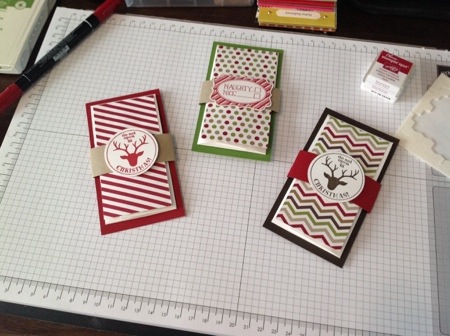
My project today is a long time favorite of mine. I have been making these envelope gift card holders for over 10 years. I keep them current by using Stampin’Up! products that are always on trend. I love the design and colors in the Seasons of Style Designer Series Paper that you can find in the 2013 Holiday Catalog. It pairs perfectly with the Very Merry Tags set. I have a picture tutorial to help you see how I made these cards that your friends and family would be thrilled to receive.

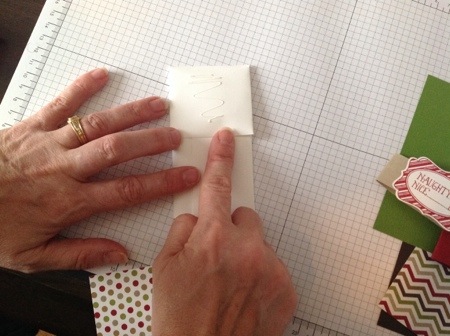
You first start with one of our standard envelopes. Score it at 4″ and then flip it and score again at 4″. I like to use my bone folder or stylus when scoring envelopes with my trimmer because it gives a deeper score through the layers. Once scored, open the envelope flap and fold in on the score lines as shown.


Add adhesive to the outside flap only and adhere a piece of 2 1/8 x 4 1/4 designer paper to the flap. When you open the envelope up you have a perfect sized pocket for a standard sized gift card or some cold hard cash if you wish.

You can tie it up with a ribbon or a belly band as i did. I took a piece of 1″ x 7″ card stock and loosely (so that you can easily slide it off) wrap it around and add your embellishment. I used stamped images and pop dotted them onto the belly band. You can also see that I glued the envelope onto a piece of 2 5/8 x 4 7/8 coordinating card stock to give it an extra layer of WOW.

I hope you learned a little something new today and will give these a try. It makes an impersonal gift card a gift from the heart!
Thank you for stopping by Tap Tap Stamp on my opening day. I hope you come back soon!
~Pam

Very informative.
Thank you sweetie. I love that you left me my first comment. Love you!
Great idea. Thanks for sharing!
Thank you Pat for stopping by!!!
Such a cute project, Pam! These are very cool and appear to be fun to make.
Thank you Brian! For everything! It’s very exciting now that I have finally done it!
Came over from Mary Fish. Welcome Back. Very nice and easy holder. Love the belly band. 🙂
Thank you Nancy! I love belly bands too. It’s even fun to say “Belly band” !!!
Very attractive end product. I will try this! Jane
Thank you Jane! Just a warning though that making these becomes a little addictive. You can’t make just one!
Great job! I am going to make some today!
Thank you Mary. So glad you like them!
Woo hoo! You are up and running! Love this project and thank you for providing the detailed instructions and photos!
I can’t thank you enough Mary. You are a such an inspiring leader. I am so glad you like the project!
So creative! Congratulations on your First Post! I love your re purposed Envelopes here scored to conceal a gift card (most popular) and decorated with the Season’s go-to paper stack! Who can resist a belly band? Love it and Pinning!
Thank you Patti! I have made so many of these recently. I just love them. I agree about the belly band. It’s fun to say belly band too. Belly band. Belly band….lol. Thank you for pinning.
Super Cute!
Thank you Deb!!!
My gift card giving list keeps growing…and these are a PERFECT way to add some FUN to giving a gift card out (especially to my grandkids). Appreciate your step-by-step instructions. THANKS for sharing this DARLING gift card holder with us!
What a huge compliment coming from you Kadie….the Queen of 3-D! Thank you for visiting my new little blog.
These are adorable! Going to try some today!
Thank you Barbara! These little cards should come with a warning. They are addictive!
Hi Pam:
The fish and the king – how sweet it is and what better role model could there be! Your gift card holders are darling and like you, the Seasons of Style DSP is a fav of mine this year. I especially like the idea that your tutorial was a series of photos with instructions. Our download speed is usually just creeping along, therefore your photos were perfect for me. Congrats on becoming a new demonstrator and best wishes to you. God Bless You.
Thank you for the kind words Jan. You are very encouraging. I am so happy that you like the photo format I used. It is the way I like to learn too. I hope you come back and visit as I post more projects!
Pam, first congratulations on your blog! It is such a cool feeling to put our work, thoughts, and hearts out to share with others. I look forward to enjoying your blog for years to come. And I love the gift card tutorial. I can’t wait to try it today.
Thank you Michelle. You are so right. I don’t know why it has taken so long to start but I am glad I finally did. Thank you for the kind words!
Congrats on.opening day. Looking forward to seeing more creations. Love the envelope gift card holders. Thanks for the instructions.
Thank you for your sweet comment! I am so glad you like my project. Happy Stamping!
What a simple yet beautiful way to make a gift card beautiful. Thank you for sharing Pam. Can’t wait to see what else you have for us 😃
Thank you Karen. You are so sweet! I am glad you stopped by. I look forward to blogging more!
Really enjoyed your first post. These card holders are so sweet, yet at the same time so “do-able” for those of us who are not quite so crafty. Will be back! Congratulations on your first post!
Thank you Kay! They really are very easy and very versatile for all occasions. I appreciate your encouraging words. I look forward to sharing more!
Hello Pam: I’m so happy for you, for your appearance on Mary’s Blog, (she has been my demonstrator for about 6 years and a sweet virtual friend too) as a guest stamper and also for your first ever blog post. I’ve known you through Brian’s blog, which has also introduced me to Sonny, who has become a super fabulous friend and card swapping buddy.
I’m looking forward to seeing your creations here, like this fabulous gift card envelope, what a great, great idea and so easy to do, thank you for the easy to follow instructions and pictures.
Have a wonderful Sunday.
Maria Rodriguez.
Thank you Maria. I am so glad you stopped by. I have always enjoyed reading your and Sonny’s comments on Brian’s blog. It’s like a little family! I am so excited to finally become an active part of it. Thank you for your sweet comment!
Hi Pam. Your blog entry is great and I love the gift holder. I am a new demonstrator. I have only been in for 6 weeks. I love the design of your blog and your relaxed writing style! Have a day
Thank you Diana for your encouraging words. Welcome to Stampin’Up! It is a great company and stampers are some of the greatest people in the world!
Hi Pam! I came over from Mary’s blog – I love your blog -it’s very fresh and fun! The gift card holder is so cool – thanks for the tutorial – very well done:-) I’ll be back!
Thank you Elisha! You are so sweet to leave such nice words of encouragement! I look forward to sharing more cards and projects!
I love this project! Quick, easy, and I can do 12 of them for all those grandkids! LOL Yep, we’ve got quite the lineup…
Celia…12 grandkids?!?! How awesome is that!?! I am thrilled that you can use my project for such a fun group! They are quick and easy and you can make them for any and all occasions. Thank you for stopping by and leaving your adorable comment!
Congratulations on your new site, very clean and attractive. Great project to try out, too.
Thank you for your sweet comment Diane. I am excited to finally get my blog launched!
Wow, what at great idea and so simple. I will definitely try this. Thanks for sharing.
Thank you Kathy… They are great for any occasion. Try it for a baby gift. You want to talk adorable?!?
Great project! How creative! I am always looking for new ways to package gift cards and will definitely use your idea. I am looking forward to reading your next post!
Thank you for stopping by and for the encouraging comment. I love this project too. They are addictive though. You will want to make them for all occasions!
Terrific idea. I will be making these to give out at Christmas.
Thank you Susan. I am so happy that you like this project! Happy stamping!
Pam, Your blog looks great and I love the taptapstamp title. And thanks for sharing the project. It’s a keeper for all year round!
Thank you Diane! I fretted for months over the name. I wanted something catchy but everything was taken! I am so glad I finally found one that I liked so that I could start my blog!!!! So glad you liked today’s project too!
Wow I did learn something today – these are adorable and I will be making some for sure! Between a fish and a king? Why you are the glue holding it all together! No one can stamp, talk, laugh and create all at the same time Ike you can! Love the design of your blog……I signed up……I’m such a groupie…..:). Welcome to Blogland!
Oh Linda….you are so sweet and one of my favorite stampers ever! We are each other’s groupies! So glad you like my little project today. It is a long time favorite of mine. Try it for a baby shower…..to die for cute! I am looking forward to finally blogging!
Wonderful idea! Thanks for sharing!
Michelle
Hi Michelle, I am a mom to 3 boys! Stamping keeps me sane! Thank you for stopping my for my grand opening. I hope you come back for more of my projects!
Pam, what a great idea! Best wishes with your new blog!
Thank you Angie!
Your blog looks great! Love the breathtaking simplicity of the gift card holder. Nice tutorial.
Thank you for such a sweet comment! They are so quick and simple. 99% of what I do is simple so I hope you enjoy the rest of my projects!
Cute idea! Lucky you to have Mary and Brian!
Thank you Michelle! I count my blessings every day!
What a fantastic project Pam! I think I will have to make one of these today. Thanks for the inspiration!
Tricia!!! Thank you for coming to my grand opening…lol! So happy you like my little project. Miss you. Give the cookies some belly rubs for me!
Hi Pam! Love your blog and what a great opener to share with everyone. These gift cards are brilliant and look so cute. Thanks for showing us how to make them!
Patti!!! Thank you for coming by. So glad you like the project. They are quick and easy and good for any occasion. Miss you and hope to see you sometime soon!
I came over from Mary’s blog. These are really lovely and look so easy to make. Thanks for the detailed instructions and photos. I have purchased many gift cards already and now I have something to put them in.
Thank you for coming over for my first post! So glad you like the gift card holders! They are quick and easy and soooo cute. Use them for any occasion. Hope you come back and visit my blog!
Woohoo! Congrats on your blog and such a cute project. Can’t wait to try it.
Thank you Sherrie. Happy stamping!
Great project and I appreciate your sharing it! Mary is fortunate to have you on her team!
What a sweet thing to say Maggi! Mary and the rest of the Pals have truly changed my world. So glad you like today’s project. I look forward to sharing more!
I am using these immediately – thanks for sharing your awesome-ness!!! Congrats on your first blog post! I look forward to seeing more of your work! Merry Christmas
You just made my day Patricia! Your sweet comment is so appreciated! Can’t wait to see you on my next post! Have fun making these and Merry Christmas to you too!
Oooo,Pam , I love it !!! Thanks for sharing ….
Hugs frenchie. Love your blog ,
Frenchie!!!! Thank you for stopping by! I’m so excited to finally blog and it fun to see my friends in here!
Yay! Pam, I am so happy you are taking the plunge into blogdom!! Love your project since I am always looking for gift card holders. Hope you get feeling better soon! XO
Thank you so much Debbie! You are such an inspiration! I am glad that you like this little project. It is so simple yet fun. I am under Dr’s care for this shoulder…it got soooo much worse two weeks ago. I could barely move. PT is helping a bit but I have a ways to go. Between Katy and I, we are a mess…lol.
Congrats on your first blog! Love the idea. Happy Holidays
Thank you Tara! Happy Holidays to you too!
Pam….. what a great surprise ! What`s not to love about this blog ? I feel like I know you through Brian and I am delighted that you are on the blog bus now ! Your title reminds me of my first SU workshop many moons ago because the demo kept telling us “Tap…tap…stamp”… love this project and your tutorial . Thanks Mary for the referral ! Congratulations on a great blog !
Sonny!!!! I know exactly who you are. I am your stampin’ grandma in the upline ranks. You are such a fun commenter on Brian’s blog. Thank you so much for stopping by and leaving such wonderful feedback. I must say “Tap tap stamp” a hundred times a workshop, so it was a natural fitting name. I hope tosee you around here some more!
Great blog ! Great project ! Great title !
Great job on your blog and the step by step instructions! Love the finish product!
Thank you Lynnette, I am a visual learner so I tend to teach that way. I love to demo for people so without even realizing it I posted that way. I hope you stop by some more!
Congrats on your new blog. Thanks for the idea.
Thank you for stopping by Lisa! I look forward to blogging!
Congratulations on your 1st blog post ,Pam! You did a fabulous job! I love your easy instructions and nice clean pics! I’ve been stamping for 10 years and I’ve never seen a gift card holder thats made like yours. I LOVE it! Such a simple concept. And, the minimal amount of supplies needed gives you more bank for your buck! (pun intended! heehee!) Thanks for sharing such a great project!
Carla!!! Thank you so much for the compliment. I am so happy to teach another old timer a new trick. Thanks for stopping by and commenting.
Nice job on your first post. Congratulations on your blog. Cute project too! Quick & easy. I like that.
Thank you Rachel! Quick and easy describes 99% of what I do!
Love your project. So professional looking. Yes, I did find you by way of Mary. Good luck in blogland and with your stamping.
Thank you Beth. I learned from the best….Mary! I look forward to sharing more with you.
Pam, this is fantastic! Congrats on beginning a blog, you’re gonna love it in blogland!
Thank you! It is a fun start. That’s for sure!
Glad I found you:-) Love the project and the name of your blog!
Thank you for stopping by! I am glad to hear you like the name. It was hard to come up with a catchy one that hadn’t been taken.
Hurray on your first blog post. I love this gift card holder idea!
Thank you Meredith! They are quick and fun!
Congratulations on a fantastic first post, Pam! So glad you are able to share your love and enthusiasm virtually. I ditto all of Linda C’s comments… (and if that “katy” comment is not for me, you had best do one, LOL!)
You noticed my Katy shout out! You had to be included in my first blog post somehow. After all you are my first true stamping buddy! I fully intend on seeing you soon and giving you your card but my shoulder is really ‘that bad’.